Ladie Butterfly's Bus Conversion
More stuff from inside to outside.
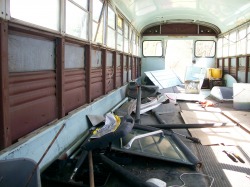
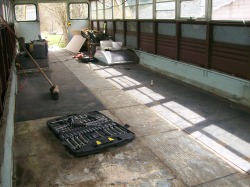
Took down all the side panels and end caps. The heater at the end came out too and we looped the hose back up and around for the water. That is another project I just finish her in the last week or so, more on that later. The side panels came down to put insulation in behind them and then but some type of new paneling. As you can see the help wasn't much help at all. All they did was lay around in the sun. We ended up putting regular pink insulation in because the spray foam was a pain to work with. The nausty yellow stuff that came out of the ceiling was cut down and stuffed in the edge along the bottom in the little opening where the frame was welded to the floor for structural support.
We also removed all the windows only later to replace some. The two larger windows at the front and then using the emgency windows next. We place the other two emergency windows one above the sink and one approximently in the center of the master bed. Those windows are nice because they open down like a regular bus window and by lifting the handle you can push out and then open up more allowing the breeze through better.
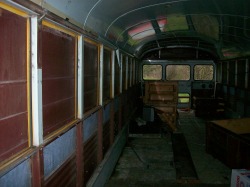
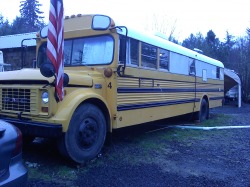
The lower metal panels inside the bus we put on the outside to cover windows then she looked like a prison bus because there was no windows except the ones on the ends. Plus the panels were rippled and not flat. It was also very dark inside. Thank goodness for summer and longer daylight hours too. So the rippled panels work a s temperary cover becaue here in
Washington it rains 9 months out of the year and there was no need of getting water inside.
We also removed all the windows only later to replace some. The two larger windows at the front and then using the emgency windows next. We place the other two emergency windows one above the sink and one approximently in the center of the master bed. Those windows are nice because they open down like a regular bus window and by lifting the handle you can push out and then open up more allowing the breeze through better.
The lower metal panels inside the bus we put on the outside to cover windows then she looked like a prison bus because there was no windows except the ones on the ends. Plus the panels were rippled and not flat. It was also very dark inside. Thank goodness for summer and longer daylight hours too. So the rippled panels work a s temperary cover becaue here in
Washington it rains 9 months out of the year and there was no need of getting water inside.

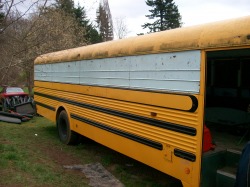
Changing the Panels outside.
We used the panels from the ceiling to make the panels on the outside of the bus windows for walls. The lights came out of the top front and back panels. Then new panels had to be cut and fitted in place, drilled and rivet them up.The panels on the outside side were tack welded in place and then sealed. I took Flash Mate and sealed all the panels inside and out on the sides, front and back of the bus. Will invest in an adhesive promoter which works like etching primer to paint on to the bus so that it won't have to be totaly sanded and then painted. I still havent decided on what color to paint her. My kids told me she should be hot pink with neon grean strips...talk about gag. On the driver side we put the frig and the opening for the frig. On top of the bus there is an AC unit. The roof was painted with a white plastic coat paint (Ace® Cool Cover White Elastomeric Roof Coating). The seams were sealed and painted with two coats. I put the second coat on and I swear if i ever have to get on top the bus again I will have some type of frame work to stand on so that I don't have to walk directly on top of it. In some of the pictures you can see the AC unit that is on top. We got that free from another fellow that was doing something of the same thing but from what I gathered he was using the chase to set his RV body on to it. You can see where the AC unit comes through the roof.


Changing the Door
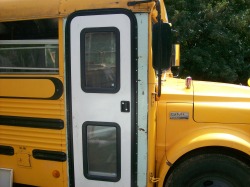
To replace the door we went to a place that sold supplies for moblie homes and contractors(VJ's Bargan Barn). It was left over stuff and damaged things. We looked and looked to find a door that opened out from the right to left. Taking the old door out was easy. I did not realize how heavy that door was i bet it wieght 3 times as much as the rv door that was put in. The door was fitted over a step that was welded in with a frame so there is a step that pulls out at approxitmently where the first step of the old door opening started. I have been told this is what they call a suicide door, I agree. The sure cure for saftey is to get a different door. Well my friends that is what shall be done. One more thing to add to the "To Do List" :) I want her safe for all.


